DevNet Expert series - Docker part 2
This is part two of the DevNet Expert series about Containers using Docker and Kubernetes. It continues where we were at the end from the first part DevNet Expert series - Docker part 1. If you do not like to go through the first part you can find the source files on the Github repository. You can simply clone it and start through with the second part.
During the first part we focused on section 4.1 from the exam blueprint which is about creating a Docker image using Dockerfile. We ignored Docker networking to keep it simple, but maybe it was not a good idea to put all Docker containers into the same network and also using the Docker default bridge network. We will take a closer look at Docker networking now according to section 4.4. which is called “Create, consume, and troubleshoot a Docker host and bridge-based networks and integrate them with external networks”. Sounds interesting, right? I will show you how to expand our application framework example using the benefits of Docker networking.
I am still using a simple lab setup in Cisco Modeling Labs (CML) with a Ubuntu 20.04 machine as devbox running Docker and external connectivity. My lab topology file is available here for download and import into CML. You could also use the official Candidate Workstation available for download on the Cisco Learning Network.
Hope you are also excited about this second part of the Containers series like I am and you follow my journey towards the Cisco Certified DevNet Expert. Let’s start!
Part 2: Docker networking
We will slightly change our design and create a frontend and a backend network in Docker to separate the containers. It is meaningful to keep different parts of functions isolated from each other and also control external connectivity of the containers. In our case the frontend network needs to have external connectivity as we had it in the default network before, but the backend network does not necessarily need to. The load balancer will be connected to both networks to serve the incoming requests and have connectivity to the application servers on the backend. The application servers will only have the backend network connected.
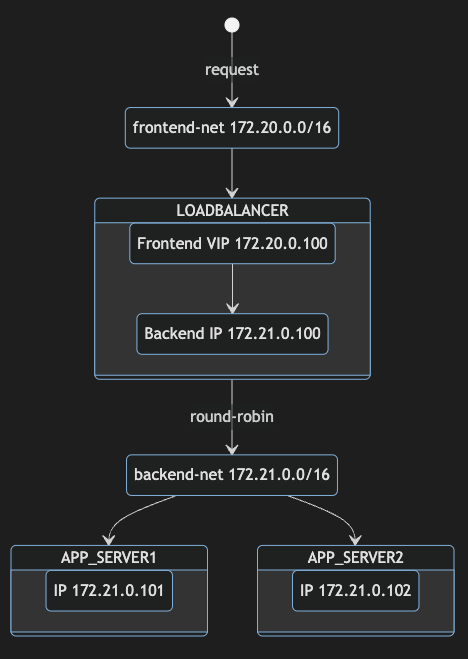
As you can see from the diagram we will also take advantage of assigning IP addresses to our containers from the new networks to get a fixed IP setup. This will make the whole setup a little bit easier to manage because we do not need to start the containers in any specific order to make sure they get a specific IP address as we did before in part one.
To begin with we take a look at the Docker networks we have out of the box using the docker network ls command.
developer@devbox:~$ docker network ls
NETWORK ID     NAME      DRIVER    SCOPE
6ba106d77aaa   bridge    bridge    local
0d30fa1bbb5e   host      host      local
91482370b08a   none      null      local
As you can see from the output there are only the default Docker networks on my machine. The Docker network mode host for a container means, that it is not isolated from the Docker host network stack and the container does not get its own IP address allocated. The none network has all networking disabled. When you create a network without specifying any options, it creates a bridge network with non-overlapping subnetwork by default. Bridge networks are usually used for applications running in standalone containers that need to communicate.
Let’s take a closer look at the default bridge network bridge using docker network inspect bridge command. You can either use the network name or the network id to inspect the network.
developer@devbox:~$ docker network inspect bridge
[
    {
        "Name": "bridge",
        "Id": "6ba106d77aaa988cf9f1f7a776d859057e87c97de23e0d5b8c35009982a80dd1",
        "Created": "2022-12-10T11:58:16.95713737Z",
        "Scope": "local",
        "Driver": "bridge",
        "EnableIPv6": false,
        "IPAM": {
            "Driver": "default",
            "Options": null,
            "Config": [
                {
                    "Subnet": "172.17.0.0/16",
                    "Gateway": "172.17.0.1"
                }
            ]
        },
        "Internal": false,
        "Attachable": false,
        "Ingress": false,
        "ConfigFrom": {
            "Network": ""
        },
        "ConfigOnly": false,
        "Containers": {},
        "Options": {
            "com.docker.network.bridge.default_bridge": "true",
            "com.docker.network.bridge.enable_icc": "true",
            "com.docker.network.bridge.enable_ip_masquerade": "true",
            "com.docker.network.bridge.host_binding_ipv4": "0.0.0.0",
            "com.docker.network.bridge.name": "docker0",
            "com.docker.network.driver.mtu": "1500"
        },
        "Labels": {}
    }
]
As you can see from the output the Docker default bridge network has a local subnet of 172.17.0.0/16 with gateway 172.17.0.1. Let’s focus on two other important settings for us. To provide external connectivity from the Docker containers attached to the bridge network the option com.docker.network.bridge.enable_ip_masquerade needs to be set to true. This option enables IP masquerading which is another wording for NAT (Network Address Translation). Then we have the option com.docker.network.bridge.enable_icc which enables inter container connectivity. That means containers attached to the same network are able to communicate with each other. We will see the differences in a minute in practice.
At this point I want to highlight some (but not all) differences between the Docker default bridge and user-defined bridges:
-
User-defined bridges provide provide better isolation
This is one of the key differences why we create user-defined networks in our example because we want to isolate the frontend and backend. By default all containers are attached to the default bridge unless specifying another network using the
--networkoption. -
Containers can be attached and detached from user-defined networks on the fly
By default you can’t remove a container from the default bridge without stopping it while you can connect or disconnect it from user-defined networks. This adds more flexibility to the container management.
-
User-defined bridges provide automatic DNS resolution between containers
The last difference I want to highlight is the automatic DNS resolution between containers which allows us to use the names of the containers instead of IP addresses to communicate with them.
For more information about Docker Networking and especially the Differences between user-defined bridges and the default bridge please look at the documentation links. Let’s move on and create our own Docker bridge networks.
Create new bridge networks
First we create the backend network named backend-net without external connectivity. We use the docker network create -d bridge command to create our new bridge network. We specify a subnet 172.21.0.0/16 and a gateway 172.21.0.1 using the corresponding --subnet and --gateway command options. In our example we want our backend application containers to not have connectivity to any external destinations therefore we will disable the IP masquerade option we talked about earlier. As we need connectivity between the containers on the backend, in our case between the load balancer and the app containers, we will enable the inter container connectivity.
docker network create -d bridge \
--subnet=172.21.0.0/16 \
--gateway=172.21.0.1 \
-o "com.docker.network.bridge.enable_ip_masquerade"="false" \
-o "com.docker.network.bridge.enable_icc"="true" \
backend-net
Similar to the backend we create the frontend network named frontend-net with external connectivity but without inter container connectivity. We use a subnet 172.20.0.0/16 and a gateway 172.20.0.1. The IP masquerade option will be enabled while we disable the inter container connectivity.
docker network create -d bridge \
--subnet=172.20.0.0/16 \
--gateway=172.20.0.1 \
-o "com.docker.network.bridge.enable_ip_masquerade"="true" \
-o "com.docker.network.bridge.enable_icc"="false" \
frontend-net
Now we check the available networks using the docker network ls command again and if our new bridge networks were created.
developer@devbox:~$ docker network ls
NETWORK ID     NAME           DRIVER    SCOPE
234c7a469fb6   backend-net    bridge    local
6ba106d77aaa   bridge         bridge    local
8a6a5362e288   frontend-net   bridge    local
0d30fa1bbb5e   host           host      local
91482370b08a   none           null      local
Let’s take a closer look into the settings we specified during the creation using the docker network inspect for both networks and compare settings.
developer@devbox:~$ docker network inspect backend-net
[
    {
        "Name": "backend-net",
        "Id": "234c7a469fb689636906866b7a30855dad4c1a239627c7613e4f3241d692ebcd",
        "Created": "2022-12-24T14:30:38.963979508Z",
        "Scope": "local",
        "Driver": "bridge",
        "EnableIPv6": false,
        "IPAM": {
            "Driver": "default",
            "Options": {},
            "Config": [
                {
                    "Subnet": "172.21.0.0/16",
                    "Gateway": "172.21.0.1"
                }
            ]
        },
        "Internal": false,
        "Attachable": false,
        "Ingress": false,
        "ConfigFrom": {
            "Network": ""
        },
        "ConfigOnly": false,
        "Containers": {},
        "Options": {
            "com.docker.network.bridge.enable_icc": "true",
            "com.docker.network.bridge.enable_ip_masquerade": "false"
        },
        "Labels": {}
    }
]
For the backend network the settings were applied as we specified it. Inter container connectivity was set to true which means it is enabled and the IP masquerade option was set to false which means disabled. What about the frontend network?
developer@devbox:~$ docker network inspect frontend-net
[
    {
        "Name": "frontend-net",
        "Id": "8a6a5362e2886f011bf798d41adbdbeddd8a9ada05912d0b33dfba38905a1e7b",
        "Created": "2022-12-24T14:58:58.35827556Z",
        "Scope": "local",
        "Driver": "bridge",
        "EnableIPv6": false,
        "IPAM": {
            "Driver": "default",
            "Options": {},
            "Config": [
                {
                    "Subnet": "172.20.0.0/16",
                    "Gateway": "172.20.0.1"
                }
            ]
        },
        "Internal": false,
        "Attachable": false,
        "Ingress": false,
        "ConfigFrom": {
            "Network": ""
        },
        "ConfigOnly": false,
        "Containers": {},
        "Options": {
            "com.docker.network.bridge.enable_icc": "false",
            "com.docker.network.bridge.enable_ip_masquerade": "true"
        },
        "Labels": {}
    }
]
It looks also good and the settings we want were applied. Let’s do some ping tests using a minimal Docker image based on Alpine Linux with a complete package index and only 5 MB in size.
We create two containers named test1 and test2. For test1 we assign an IP address of 172.21.0.10 and run it in detached mode in the background. For test2 we assign an IP address of 172.21.0.11 and run in interactive mode which means we are on the console after it started. Then we can start our ping tests. We use the -rm command option which will remove the containers when we stop them.
# Run test1 container
developer@devbox:~$ docker run -itd --rm \
> --network=backend-net --ip=172.21.0.10 \
> --name test1 alpine
60bf5bb2752fab6b8849e55c63bc2d0cdc19d00ff18fc095aad251395f88aa5b
# Run test2 container
developer@devbox:~$ docker run -it --rm --network=backend-net --ip=172.21.0.11 --name test2 alpine
# Ping the gateway
/  ping 172.21.0.1
PING 172.21.0.1 (172.21.0.1): 56 data bytes
64 bytes from 172.21.0.1: seq=0 ttl=64 time=0.276 ms
64 bytes from 172.21.0.1: seq=1 ttl=64 time=0.121 ms
64 bytes from 172.21.0.1: seq=2 ttl=64 time=0.096 ms
64 bytes from 172.21.0.1: seq=3 ttl=64 time=0.097 ms
^C
--- 172.21.0.1 ping statistics ---
4 packets transmitted, 4 packets received, 0% packet loss
round-trip min/avg/max = 0.096/0.147/0.276 ms
# Ping test1 container
/  ping test1
PING test1 (172.21.0.10): 56 data bytes
64 bytes from 172.21.0.10: seq=0 ttl=64 time=0.293 ms
64 bytes from 172.21.0.10: seq=1 ttl=64 time=0.139 ms
64 bytes from 172.21.0.10: seq=2 ttl=64 time=0.113 ms
64 bytes from 172.21.0.10: seq=3 ttl=64 time=0.115 ms
^C
--- test1 ping statistics ---
4 packets transmitted, 4 packets received, 0% packet loss
round-trip min/avg/max = 0.113/0.165/0.293 ms
# Ping Google DNS server
/  ping 8.8.8.8
PING 8.8.8.8 (8.8.8.8): 56 data bytes
^C
--- 8.8.8.8 ping statistics ---
4 packets transmitted, 0 packets received, 100% packet loss
/  exit
developer@devbox:~$ docker ps
CONTAINER ID   IMAGE     COMMAND     CREATED          STATUS          PORTS     NAMES
60bf5bb2752f   alpine    "/bin/sh"   20 minutes ago   Up 20 minutes             test1
developer@devbox:~$
developer@devbox:~$ docker stop 60bf5bb2752f
As you can see from the output the backend bridge network works as expected. The gateway is reachable but the external connectivity is not. The connectivity between the containers is working and we used the automatic DNS resolution we talked about before to verify it. The test1 container name was resolved with the IP address we assigned to it. We exited out from test2 und stopped test1 which is then removed. Now we do the same tests for the frontend bridge network.
# Run test1 container
developer@devbox:~$ docker run -itd --rm \
> --network=frontend-net --ip=172.20.0.10 \
> --name test1 alpine
727d3bc5e0b45a49fbcd743cb18065d4c51c31f627d31719230eaeddae4391e6
# Run test2 container
developer@devbox:~$ docker run -it --rm --network=frontend-net --ip=172.20.0.11 --name test2 alpine
# Ping the gateway
/  ping 172.20.0.1
PING 172.20.0.1 (172.20.0.1): 56 data bytes
64 bytes from 172.20.0.1: seq=0 ttl=64 time=0.284 ms
64 bytes from 172.20.0.1: seq=1 ttl=64 time=0.129 ms
64 bytes from 172.20.0.1: seq=2 ttl=64 time=0.108 ms
64 bytes from 172.20.0.1: seq=3 ttl=64 time=0.102 ms
^C
--- 172.20.0.1 ping statistics ---
4 packets transmitted, 4 packets received, 0% packet loss
round-trip min/avg/max = 0.102/0.155/0.284 ms
# Ping test1 container
/  ping test1
PING test1 (172.20.0.10): 56 data bytes
^C
--- test1 ping statistics ---
4 packets transmitted, 0 packets received, 100% packet loss
# Ping Google DNS server
/  ping 8.8.8.8
PING 8.8.8.8 (8.8.8.8): 56 data bytes
64 bytes from 8.8.8.8: seq=0 ttl=118 time=15.851 ms
64 bytes from 8.8.8.8: seq=1 ttl=118 time=14.852 ms
64 bytes from 8.8.8.8: seq=2 ttl=118 time=14.794 ms
64 bytes from 8.8.8.8: seq=3 ttl=118 time=14.801 ms
^C
--- 8.8.8.8 ping statistics ---
4 packets transmitted, 4 packets received, 0% packet loss
round-trip min/avg/max = 14.794/15.074/15.851 ms
/  exit
developer@devbox:~$ docker ps
CONTAINER ID   IMAGE     COMMAND     CREATED          STATUS          PORTS     NAMES
727d3bc5e0b4   alpine    "/bin/sh"   58 seconds ago   Up 56 seconds             test1
developer@devbox:~$ docker stop 727d3bc5e0b4
From the output we can see that the frontend bridge network also works as expected. The gateway and Google DNS server are reachable but the inter container connectivity is not working no matter the automatic DNS resolution worked.
Now everything is prepared to bring up all containers from our example while attaching them to our user-defined bridge networks we created.
Bring all containers up again
Let’s run both application containers named myapp1 and myapp2 first and connect them to the backend bridge network backend-net using the --network together with the --ipoption to assign a specific IP address from that network.
docker run -itd \
--network=backend-net --ip=172.21.0.101 \
--name myapp1 myapp
docker run -itd \
--network=backend-net --ip=172.21.0.102 \
--name myapp2 myapp
developer@devbox:~$ docker ps
CONTAINER ID   IMAGE     COMMAND             CREATED          STATUS          PORTS      NAMES
d4aa6d87fe5d   myapp     "python3 main.py"   27 seconds ago   Up 24 seconds   5000/tcp   myapp2
902c09b50e38   myapp     "python3 main.py"   34 seconds ago   Up 32 seconds   5000/tcp   myapp1
Both application containers are up and running. We can quickly use the docker inspectcommand to check if the network settings were applied as expected. For better visibility I removed most of the output as it gives a lot of data back.
developer@devbox:~$ docker inspect myapp1
<output omitted>
"Networks": {
    "backend-net": {
        "IPAMConfig": {
            "IPv4Address": "172.21.0.101"
        },
        "Links": null,
        "Aliases": [
            "902c09b50e38"
        ],
        "NetworkID": "234c7a469fb689636906866b7a30855dad4c1a239627c7613e4f3241d692ebcd",
        "EndpointID": "1ad831f2b470bb1250c94393ff6f19d26021aa4248eae921a54a17cda1a2e66e",
        "Gateway": "172.21.0.1",
        "IPAddress": "172.21.0.101",
<output omitted>
So far so good with the application containers. Before we start the load balancer container we need to adjust the nginx.conf file and update the image as we use other IP addresses than in part one. You can simply edit the existing files or make a copy of the files and edit the copy. I have created a new folder in the repository I used for this blog posts which you can find here. Switch to the lb directory, open the nginx.conf file, and update the IP addresses according the network diagram.
events {}
http {

  upstream myapp {
    server 172.21.0.101:5000;
    server 172.21.0.102:5000;
  }

  server {
    listen 8080;
    server_name localhost;

    location / {
      proxy_pass http://myapp;
      proxy_set_header Host $host;
    }
  }

}
Save the file and update the Docker image using the docker build . -t mylb command from the lb directory.
developer@devbox:~/devnet-expert-lab/blog/docker/part2-files/lb$ docker build . -t mylb
Sending build context to Docker daemon  3.072kB
Step 1/4 : FROM nginx
 ---> ac8efec875ce
Step 2/4 : COPY nginx.conf /etc/nginx/nginx.conf
 ---> 5b956db57667
Step 3/4 : EXPOSE 8080
 ---> Running in 97df5e000e01
Removing intermediate container 97df5e000e01
 ---> 567098c461bb
Step 4/4 : CMD ["nginx", "-g", "daemon off;"]
 ---> Running in 871b051f5bf2
Removing intermediate container 871b051f5bf2
 ---> 59767fb921d4
Successfully built 59767fb921d4
Successfully tagged mylb:latest
Now we are ready to run the load balancer container named mylb1 exposing the tcp port 8080 as we did during part one. As the docker run command only allows one network to be specified along with the --network option we only connect the frontend bridge network in a first place and assign the IP address 172.20.0.100.
docker run -itd -p 8080:8080 \
--network=frontend-net --ip=172.20.0.100 \
--name mylb1 mylb
Then we use the docker network connect command to attach the running load balancer container mylb1 to the backend network using the IP address 172.21.0.100.
docker network connect --ip 172.21.0.100 backend-net mylb1
Again we inspect the container to check if the network settings were applied for the load balancer as well.
developer@devbox:~$ docker inspect mylb1
<output omitted>
"Networks": {
    "backend-net": {
        "IPAMConfig": {
            "IPv4Address": "172.21.0.100"
        },
        "Links": null,
        "Aliases": [
            "2f86fc7286cd"
        ],
        "NetworkID": "234c7a469fb689636906866b7a30855dad4c1a239627c7613e4f3241d692ebcd",
        "EndpointID": "9943ba4a79eddc99c37a5e14e6e372ad00f81bc828b3f8c3acca00ad002d4a57",
        "Gateway": "172.21.0.1",
        "IPAddress": "172.21.0.100",
        "IPPrefixLen": 16,
        "IPv6Gateway": "",
        "GlobalIPv6Address": "",
        "GlobalIPv6PrefixLen": 0,
        "MacAddress": "02:42:ac:15:00:64",
        "DriverOpts": {}
    },
    "frontend-net": {
        "IPAMConfig": {
            "IPv4Address": "172.20.0.100"
        },
        "Links": null,
        "Aliases": [
            "2f86fc7286cd"
        ],
        "NetworkID": "8a6a5362e2886f011bf798d41adbdbeddd8a9ada05912d0b33dfba38905a1e7b",
        "EndpointID": "4de0671ff7e54e7a113dfcc468eae2af32713a50793fd61376764bec79a6b51a",
        "Gateway": "172.20.0.1",
        "IPAddress": "172.20.0.100",
        "IPPrefixLen": 16,
        "IPv6Gateway": "",
        "GlobalIPv6Address": "",
        "GlobalIPv6PrefixLen": 0,
        "MacAddress": "02:42:ac:14:00:64",
        "DriverOpts": null
    }
}
<output omitted>
Everything looks good so far. It is time to test the Docker networking setup we build. For that we try to access the load balancer container from the devbox itself using a curl 127.0.0.1:8080command.
developer@devbox:~$ curl 127.0.0.1:8080
Welcome to the Docker Lab.<br>The IP address of the server is 172.21.0.101.<br>

developer@devbox:~$ curl 127.0.0.1:8080
Welcome to the Docker Lab.<br>The IP address of the server is 172.21.0.102.<br>
It works! The first request was sent to the first application container myapp1 with IP address 172.21.0.101 and the second request we made was load balanced to the second application container myapp2 with IP address 172.21.0.102. Let us test the connection with a web browser using the IP address of the devbox on port 8080. In my case it is http://192.168.11.51:8080/.

Now we refresh the web browser and get a response from the second application container as before with the curl command.

Great everything worked, hopefully also for you if you followed along. After creating our own Docker images during part one we now extended our simple application framework example with some advantages of Docker Networking using user-defined bridge networks.
I hope it was again easy to follow and to replicate on your own setup. If you face into any issues with the setup or if you found any errors please let me know and/or leave a comment using the Github issues.
Thank you for reading this blog post and following along until the end. Stay tuned for the next blog post about Docker where we will further optimize the setup we build today using Docker Compose.
Links & References
GitHub
Cisco Modeling Labs
Cisco Learning Network
- Cisco Certified DevNet Expert Certification and Training
- DevNet Certifications Community
- Cisco Certified DevNet Expert (v1.0) Equipment and Software List
Comments
Post comment